- Home
- About us
- Products
- Deep Groove Ball Bearing
- Ball Screw
- Self-aligning Ball Bearing
- Spherical Roller Bearing
- Thrust Aligning Roller Bearing
- Tapered Roller Bearing
- Thrust Ball Bearing
- Angular Contact Ball Bearing
- Thrust Roller Bearing
- Cylindrical Roller Bearing
- Pillow Block Bearing
- Machinery Equipment
- Thrust Conical Roller Bearing
- Bearing Cage
- Discount and Promotion all bearing
- Steel Balls
- Faqs
- News
- Certificate
- Contact us
Domestic Bearing Drawings VS Foreign Bearing Drawing
time2019/08/28

- In order to better learn advanced technology in developed countries, it is necessary to quickly understand foreign bearing mechanical drawings.
Domestic Bearing Drawings VS Foreign Bearing Drawing
Since the reform and opening up, China has introduced a lot of foreign equipment, drawings, and other technical materials. Many developed countries have different methods for projecting mechanical patterns than those used in China. In order to better learn advanced technology in developed countries, it is necessary to quickly understand foreign bearing mechanical drawings.
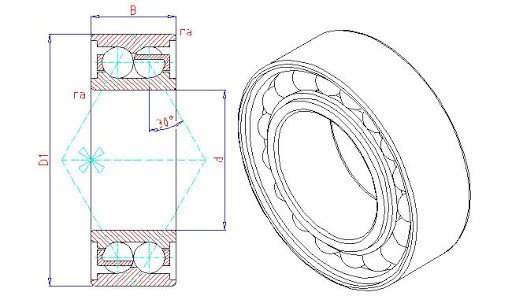
1. Overview of Bearing Drawings
In today's world, ISO international standards stipulate that the first and third angle projections are equally effective. European countries use the first angle projection. While the United States, Japan, France, the United Kingdom, Canada, Switzerland, Australia, the Netherlands Countries such as Mexico and the United States mainly use the third angle projection.
Before the liberation, China also adopted the third-angle projection. After the founding of New China, the first-angle projection was used. Imported foreign mechanical bearing drawings and scientific books always use third-angle projections. The ISO International Standard specifies projection marks for the first and third corners (Figures 1 and 2). Draw marked symbols in the title bar. Therefore, people can identify these patterns based on these bearing drawing symbols, but some drawings have no projection marks.
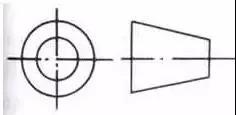
Figure 1
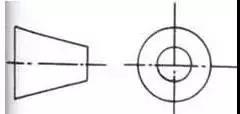
Figure 2
2. The Third Triangle Projection
Divide the space into eight regions by the normal plane V, the horizontal plane H, and the side plane W. Which are the first, second, third, fourth, fifth, sixth, seventh, and eighth angles, respectively. 3 is shown.
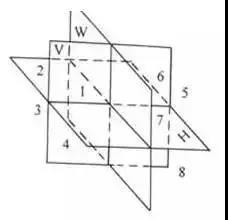
Figure 3
2.1 The first annular projection is to project the object within the first-minute angle, which is also known as the E method - the European method.
2.2 The third angular angle is to project the object in the third angle called the triangular projection. It is also known as the A method - the American method.
3. Use the Third Angle Projection Method in China
The third triangle projection is a method of imagining that an object is placed in a transparent glass box. And, use each side of the glass box as a projection surface. In addition, use the method to obtain a bearing figure according to the position of person-face-object by orthographic projection, as shown in FIGS. 4 and 5.
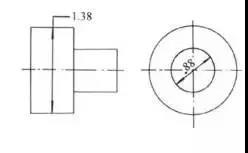
Figure 4,5
Position of the six basic views in the third triangle projection
The ISO international standard stipulates that the positions of the six basic views in the third-angle projection are like the picture as below Fig. 6.
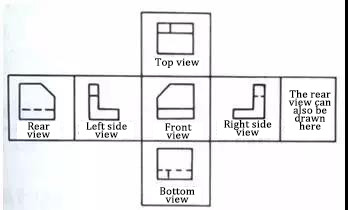
Figure 6
The method to obtain the above view is to project objects onto the projection surfaces of a closed rectangular (transparent) "projection box".
People can see each view as the actual image of the object he sees when the observer's line of sight is perpendicular to the corresponding projection surface.
The front view is the observer who imagines that he is in front of the object and moves the position of the eyepoint by point. And the line of sight is always perpendicular to the imaginary erected projection surface (transparent) to obtain the front projection of the object. Other views are available in a similar way.
The reader should always view the view as one side of the object itself. From the front view, you can see the height and width of the object, as well as the top, bottom, left and right sides of the object. The top view shows the depth and width of the object.
